How to Get Your Planner Idea Off the Ground
For some of you, spontaneous designing is how you produce some of your best work, and even for me there are times where I’m not able to quite capture what I have in mind unless I just go for it. But, for the most part, a great design project will start with a plan.
Of course, I think everyone will kind of fall into their own workflow and find processes that work best for your type of work style, but if you’re new to the design world and need a hand in getting started on your next project, I’m going to walk you through my thought process as I’m developing a project, show you the tools & software that I use, and how I stay organized in keeping all of my thoughts in one place.
So, let’s go ahead and get started!
Brainstorming Your Next Planner Idea
To begin this design workflow, we’re going to go old school and pick up a pen and paper.
I personally do my best thinking when I’m physically writing in my notebook. That’s where all of my ideas kind of come to life for me, but if you’re following along, you can always do this digitally in a digital notebook or on your notes app on your phone.
The most important part for this step is to just have a place where you can dump all of your ideas down in one place.
Typically, to start off a project, I start with listing off any ideas I have for my project. This could be any planner features I want to include, the pain point I want to target, why I want to create this product, any style techniques I want to utilize. Pretty much anything you want to brain dump onto your page.
For me, this process isn’t the most “pretty” process. Most of the time, this braindump is the product of weeks of quickly jotting down thoughts as I have them without any rhyme or reason. I don’t typically sit down and do this step all in one go, rather it’s more of an ongoing process.
Don’t feel like your notes have to make sense at this point in time. We’ll get to the point where we bring it all together, don’t worry!
Organize Your Notes & Ideas
Now that we have our brain dump, my next step is to head over to Milanote.
I discovered Milanote about a year ago, and it’s completely changed my design workflow for the best. Before, I would do the same steps as I’m about to share with you, but I would bookmark everything in folders on my internet browser to save for later, which worked for the most part, but I definitely like this system a lot better.
I’m sure there are tons of different platforms out there that do something similar to Milanote, so if you already use one that you like, feel free to go with that one.
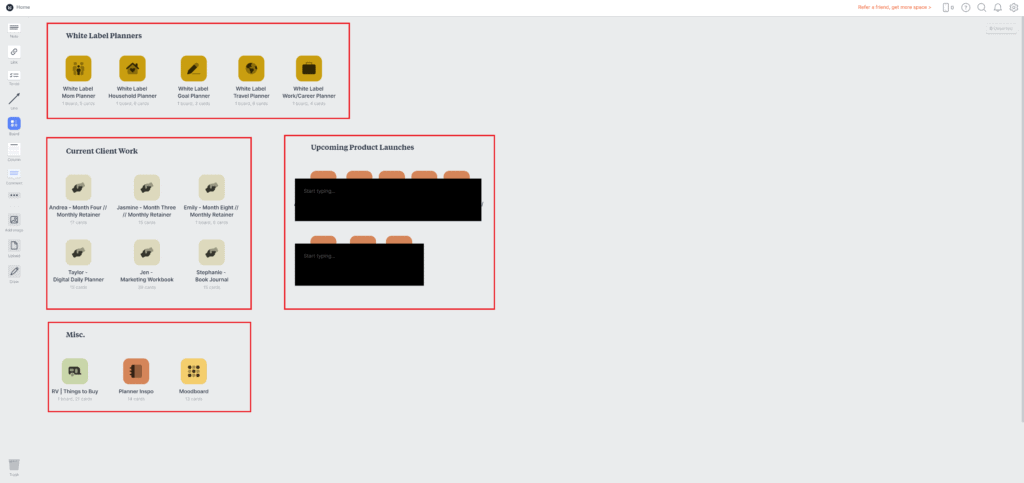
For me, I like to organize my boards by categories, and each individual project gets their own board. So, I have all of my white label planner projects, some of my larger client projects, products I want to sell, and some miscellaneous projects that I can have access to.
To give you an example of how I do my research, as you can see in one of my white label planner projects, I typically start to curate a list of pages I want to include in my planner, so I create a “Planner Pages” card within my board.
If I’ve already started creating a list of pages from my brainstorming session, I’ll add those ideas here. But, I also usually continue to add pages as I research my topic or planner idea even more as I get inspiration.
I also add a “To-Do List”, which yours may look different from mine, but here are basically all of the steps I take from start to finish to get a product launched and I check them off each time I complete a task.
How to Research Your Next Planner Idea
And next, you see here that I have a “Research” card. This is where I’ll bookmark any links that I want to reference as I’m designing my planner.
For my design style in particular and our company standards, I utilize a lot of practical and valuable prompts and information in all of my products and client projects, because my goal in creating planners and workbooks is to actually solve real-life problems. So, I conduct a ton of research before I start designing anything.
To do this research, I typically just type in Google a broad search term related to the topic I’m designing for. So, in the case of this example for my white label home planner, I probably typed in something along the lines of “home management”, and what I’m looking for are main pain points within this topic and their solutions, any popular tips, or overall anything that may spark some inspiration for pages that I can add, or features I can include to make my planner valuable, and for safe keeping, I’ll copy the URL of any articles I find helpful and past them under my “Research” card.
The point of this research isn’t to take other people’s ideas as your own. You simply want to learn more about the topic you’re designing for, and also get ideas for content you can create.
I typically stay away all together from looking at other peoples products that are related to what I’m creating to completely avoid plagiarism.
If you ask me, if you’re passionate about what you’re creating, then you should be able to develop design concepts and ideas on your own without needing to piggyback off of someone else’s designs.
Create a Moodboard for Your Planner Idea
Okay, so we’ve saved our research for us to continue to reference back to in our “Research” card, now we’ll move onto my favorite part, which is Moodboards.
This may be different for you, but for me, my moodboards consist of font pairings I like, color palettes I want to try, images that provide the mood I’m trying to capture within my designs, or it could be inspiration for my sales page, or product images, or anything visually that you see on the internet that inspires you.
The cool thing about Milanote is if you install their extension, if you hover over any image online, you’ll be able to save that image directly into your moodboard. Which I think is super useful!
How to Research & Brainstorm Your Planner Idea
And that’s it you guys! An incredibly straightforward, go with the flow process of how I personally brainstorm and research my new design projects.
I keep my Milanotes on hand and reference them frequently as I’m actually outlining and designing my planner, and having everything in one central location is super helpful for me to quickly bring my ideas to life.
I’m curious as to what your design process is. Are there extra steps that you take? Or are there steps you feel like you would omit all together?
Let me know in the comments because since I’m constantly creating and designing, I try to continuously streamline my process so I can be a more effective designer. I can’t wait to hear your thoughts.
And also, if you’d like to learn more about how to actually sell your planners online, feel free to check out our free ebook – How to Successfully Sell Digital Products Online, where we’ll go over how to take the planners you’ve designed and turn them into passive income.
As always, thanks so much for stopping by.
Until next time!