Have you ever asked how to use Pinterest for Etsy sales? You’re definitely not the only one.
Pinterest seems to be that “secret-sauce” everyone is trying to dissect and get their hands on.
Often times, I think that it is portrayed to be a strategy that is a lot harder than what it actually is.
Developing a consistent and valuable Pinterest strategy is simple, quick, and uncomplicated. All you need is the right elements of the puzzle to piece it together in a way that works best for your brand and business.
I love love love Pinterest because of all of the amazing opportunities it gives people in a relatively short period of time and without the sweat of gaining followers in order for people to see your content.
With my strategy, you don’t have to track your followers or your monthly views on Pinterest (unless you really want). You just have to be consistent and that’s it! Easy-peasy.
Ready to rock and roll?
Related Post: How to Double the Traffic to Your Printable Planner Etsy Shop
How to Use Pinterest for Etsy Sales
First things first, we have to lay out on the table the difference between a healthy, thriving Pinterest strategy and one that is lacking in effectiveness.
If you are simply pinning your Etsy products directly from Etsy using the “Pin It” button every once and while, then you are NOT being effective with your time on Pinterest. It requires so much more than this and you will see such amazing benefits for your biz if you put some more time and strategic effort into it.
There is a much smarter way to pin that is going to up your game on Pinterest that includes attracting your targeted audience onto your Pinterest account, optimizing your account to turn your browsing audience into a buying audience, creating clickable and converting pins, and finally mastering Pinterest SEO (yes! You have to think about SEO not only on Etsy but also with Pinterest. Don’t shoot the messenger).
All of these tips and tricks will directly funnel your visitors into your Etsy shop and turning your expensive hobby into a thriving business.
OPTIMIZE YOUR PINTEREST PROFILE
We both know the benefits of using Pinterest to attract a large audience and send them to your shop, so it’s time to finally get over that hurdle of randomly pinning or having off-topic pins.
The truth is, you can have thousands and thousands of followers, but if they’re not clear on what your brand is about or they’re simply following you for the cookie recipes you pin, then there’s no way you’re going to convince them to click on your images and buy your products.
I’m going to walk you step-by-step on how to optimize your Pinterest profile to get your target (paying) customers coming in, in no time at all.
STEP ONE: CREATE A BUSINESS ACCOUNT
Okay, so you may have heard this before, and if you still haven’t done it, I’m going to convince you today why you should!
Creating a Pinterest Business Account is so stinking easy while also coming with a ton of important benefits that you can take advantage of.
You can even convert your existing personal account into a business one so you can keep all of your personal boards!
If you prefer to create an entirely different Pinterest account to keep business and personal separate, then that’s totally fine too!
Some of the benefits of creating a Business Account for your Etsy shop instead of sticking with a personal account includes:
- The ability to display your company name, rather than your personal name, on your profile. Why is this important? Because this makes you look more professional and your business will seem more established.
- You’ll have the ability to verify your website to show you’re a legitimate account.
- Get analytics on your pins and boards. This is incredibly useful in evaluating and adapting your Pinterest strategy.
STEP TWO: UPLOAD A PROFILE PICTURE
This may seem redundant, but believe it or not, there are many ways you could go wrong with uploading your profile picture.
As a brand and a business, you’ll want to upload a photo of you as the creator.
No, I would not recommend using your logo as a profile picture.
Remember, your Pinterest followers aren’t your customers (just yet), so they are expecting and looking for more of a human component to your Pinterest account, rather than someone trying to sell them.
If you’re anything like me, taking pictures is not the most exhilarating thing to do, but for only a moment, I’m suggesting that you suck it up and get your photo taken.
Whether it’s taken on your phone or professionally done, make sure your photo is clear, well lite, and shows your brand’s personality.
If your brand is known for being fun and witty and colorful, it wouldn’t make sense for you to do a traditional business headshot with a dull background.
Have some fun with this!
Once you get your beautiful picture taken and are ready to upload it onto Pinterest, you’ll want to remember to add your main keywords and business name in your alt text.
Quick Tip: Your Pinterest profile picture should be the same as your other social media profile pictures to maintain brand consistency.
STEP THREE: YOUR PROFILE NAME
The fun thing about your Pinterest name is that it is optimized for SEO even though it is a tiny little piece of your Pinterest profile.
It’s important that you include your business name first, so people know who you are, and then some keywords following it.
Your Pinterest name is searchable, so if you have a focus keyword that you are trying to rank for, make sure that you use it here!
Use this formula: [Business Name] + 1-2 Main Keywords
STEP FOUR: YOUR BIO
Your Pinterest Bio is a short paragraph that describes not only what your business is about, but also what you are able to offer to your target audience.
When your target market reads this statement, they should feel like you are speaking directly to them. All of their pains, struggles, wants, and desires should be answered in this bio.
Show them that you are the brand they have been looking for!
Now that you have them hooked, offering a juicy freebie is going to absolutely seal the deal. They won’t help themselves but to click and join!
These are the two things you’ll want to include in your bio:
- A description of who you help
- A freebie offer to join your email list (your website link should link to this)
STEP FIVE: CHOOSE YOUR PINTEREST KEYWORDS
From here on out, keywords are going to be CRUCIAL to your Pinterest optimization (or how your page gets found by your target market).
Thankfully, Pinterest is a little more simple than Google when it comes to SEO and keywords.
There are less long-tail keywords that users search for and more single phrases – so you can get away with using broader terms.
To get started with coming up with the keywords you’re going to use throughout your profile, sit down with a piece of paper and go through this exercise:
- Create a list of the main topic areas you want to target throughout your account. These will be the broad terms that you will begin your research with.
- Go to Pinterest and the search broad terms see what comes up. If pins that show up aren’t your topic area, try another keyword.
- If you get a keyword that offers relevant pins, look at the top of your screen below the search bar. There should be a list of relevant keywords that you can also take advantage of.
- Gather together these keyword ideas from Pinterest.
- Write down each Pinterest board that you have (or are planning to create) and list at least 10-15 keywords that you’ll consistently use throughout that board (board name, board bio, pin SEO).
When it comes to Pinterest profile optimization, we want to pick keywords that are going to bring traffic and attention to our pins so doing a little bit of research is the best way to ensure this will happen.
STEP SIX: SET UP YOUR PINTEREST BOARDS
One of the most important aspects of Pinterest is going to be your Pinterest boards.
Your boards need to be focused on what your target audience will find beneficial, interesting, and what they need and want.
If you know who your target market is, this shouldn’t be hard figuring this out, but just remember that ALL of your boards must apply to them.
Set up at least 3 to 4 boards for each category/topic that your business is about and name these boards with the right keywords.
Remember, you want to take your time to come up with good keywords for each board before moving on.
For example, if you sell home textiles for your Etsy shop, you may want to include boards such as:
- Etsy Shop Creations (where you include the products that are made solely by you)
- Linen Bedding (where you pin other pins related to linen bedding + your products)
- Linen Curtains (where you pin other pins related to linen bedding + your products)
- Linen Bath Towels (where you pin other pins related to linen bedding + your products)
- Blankets and Throws (you may not sell these in your shop, but they are related to your niche and will attract the same target audience)
- Home Decor (this is a broad board that you can pin multiple types of pins on, including your own)
- Group Board: Linen Home Textiles (pinning on group boards is a good way to get tons of eyes on your content)
As you can see from the example, there’s a good mixture of boards relating solely to your products, boards that you can pin both your products and others, boards where you pin only other people’s content, and then group boards.
Make sure you name your board using your main topic keyword for the content on this board!
Edit and write a keyword rich description for your board using more of those Pinterest suggested keywords.
Describe in detail what it is that you’re going to be pinning in this board in about 50 words that using a few different keywords to describe the content on this board.
For example, for a Pinterest board about SEO, I might use these keywords: SEO, search engine optimization, and SEO tips.
Additionally, include the proper category because that’s just one more great way to let Pinterest know what your pins are about.
When you create these boards, pin at least 30-40 pins that Pinterest already knows and is relevant to your board before you begin pinning your own content to the board.
This way, Pinterest can understand what your boards are all about.
THE BEST PINS TO CREATE FOR ETSY SELLERS
Odds are, you aren’t pinning the right type of stuff for your target audience!
Let’s face it, we can’t pin the same things a blogger or other businesses can. Today, I’m going to give you some tips and pointers on the best things you can pin when you have nothing else to pin!
01. ENTIRE SHOP COLLAGES
Add a variety of photos to your pin that represent your Etsy shop, including inspirational photos, product photos, and your products in use. Don’t forget to add your logo or Shop name where browsers can see and remember.
02. BEHIND THE SCENES
Customers are more inclined to purchase your product if there is a story behind it. Any chance that you can get to put a face behind your shop you should take advantage of. Snap a few photos of you creating your product. Have a well lite and quality photo showing your process. Don’t forget to link your pin back to an Etsy listing or your Etsy shop home page.
03. INDIVIDUAL ITEM
If you want to highlight one item, you may want to consider making a pin completely revolved around it. Along with the picture of your item, include descriptive wording about your item and a call to action to get browsers to click through to your Etsy shop. Again, include your logo or Shop name where browsers can see and remember it.
04. SHOP FEEDBACK
This is a great way to show your credibility and the featured product. Make sure you add the picture of the product being reviewed, the actual review that the product got including the rating and your logo or Shop name where browsers can see and remember it.
O5. SHOP CATEGORIES
Create a pin with a photo collage of all of the items under one of your Etsy categories. Highlight the best of your products, including a call to action. Link your pin to the shop category instead of an individual listing so the browser can see all of their options.
06. YOUR BLOG POSTS
If you have created a website outside of Etsy in your marketing strategy, you’re also going to want to pin your blog posts to Pinterest. Create a catchy title explaining what your blog post is about and use a strong call-to-action to entice your audience to click through and read.
Looking for a straightforward done-for-you solution to pinning for your planner shop? Check out our Editable Pinterest Templates, designed specifically for displaying printable planners. Just update your brand colors, add your branding and publish on Pinterest! It’s as easy as that!
DESIGNING PINS THAT CONVERT TO SALES
Your Pinterest pin style plays a vital role in the success of your Pinterest strategy.
Even if you do absolutely everything right on Pinterest, if your pins aren’t attractive to look at, you won’t see any results with your traffic. Your pins should:
- Be long and vertical. Try using the dimensions as tall as 1100 pixels to 2200 pixels tall
- Have excellent Pinterest SEO
- Have an interesting/engaging title that makes people want to click through
- Have wording on them that is easy to read.
- Be wary of script fonts and light colors
- Have your business name or logo on them to prevent them from being stolen
- Use clear and quality photos
There are multiple characteristics of a Pinterest pin that can make it stand out and be more favorable and let’s face it – get you more clicks!
To create your pin graphics, I suggest using either Canva or PicMonkey. These are easy to use platforms that basically allow you to drag and drop photos, text, and graphics to your pin and download it.
01. MAKE YOUR PINTEREST PINS TALL
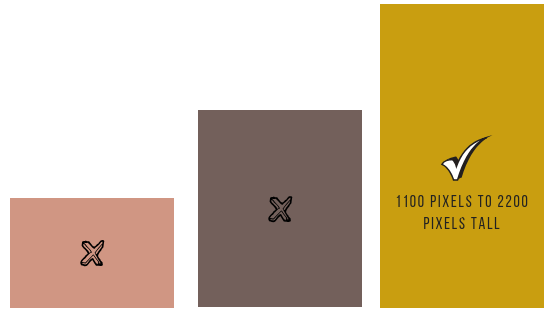
Having tall pins draws the attention of Pinterest users because it takes up more space on their screen when they’re scrolling.
In addition to this, you also may find it beneficial to use taller pins because it gives you more space to put more content on the pin that further entices your audience to click through or save.
For instance, you can add more branding, graphics, offers, text, and call-to-actions.
You’ll want to aim to create a pin as tall as 1100 pixels to 2200 pixels tall. Use this image below as a guide.
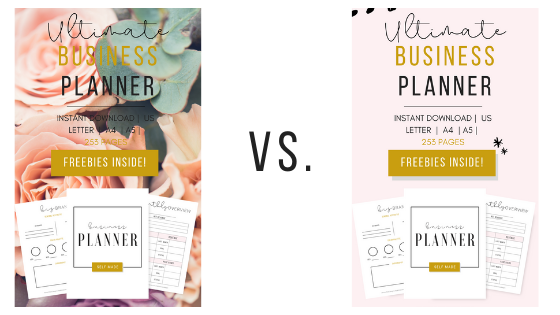
02. CHOOSE THE RIGHT BACKGROUND FOR YOUR PINS
One of the most important elements of your pin is going to be your background.
This can be the difference between having a stunning, easy-to-read pin and a disaster.
You can either use a white background, a color background, or an image.
I suggest if you’re going to have a lot of text and graphics on your pin to stick with a solid background so it doesn’t seem as busy.
Choose the Right Image for Your Background
Sometimes, an image is the best option for the background of a pin.
For those particular pins, choose an eye-catching image and use a slightly transparent box overlay before you write text on it.
You want any text that you use to stands out and doesn’t blend into your background.
Choose the Best Color
If you decide to go with a solid background, you’re going to want to pick the best color.
If your brand has a certain color scheme, you may want to stick with those colors if they go well together.
If you’re still stuck, pick colors that catches the eyes and that people are drawn to.
I’ve noticed that pins that use red or orange are re-pinned significantly more than those that have a cooler color scheme, like blue.
Try leaning more towards bright and warm colors for your background!
03. BRAND YOUR PINS
As mentioned before, since you’re creating a taller pin, you are going to have quite a bit of extra space at the bottom to make it yours.
Utilize the bottom of your pin to include your website name or your logo so that people can know where the pin originates from.
I recommend doing this not only for the recognition but also because the more your audience comes across your pins with the same name or logo, the more they will come to recognize and trust your brand.
Also, this will (hopefully) prevent anyone from stealing your pin image and using it as their own.
04. WRITE AN EASY TO READ HEADLINE
Now that you have a background in place and your branding on your pin, now it’s time to focus on the most crucial part of your Pinterest pin layout.
First and foremost, you want text that is straightforward and easy to read.
Stay far, far, FAR away from tiny fonts or heavily scripted fonts that make it harder for your audience to read at a glance.
People are scrolling quickly on Pinterest and you need texts and fonts that are easily read just by glancing at it.
To break up some of the text and create some balance on your pin, you may want to consider using a different font for certain words or phrases.
I love this technique because it directs people’s attention to precisely what you need them to see.
If you do this, make sure you don’t use any more than two fonts on your pin layout.
Additionally, make sure there’s sufficient contrast between the background and your text.
You can do this with a box overlay (that I mentioned earlier) and either keeping it solid or making it a little transparent if you want the image in the background to show through a little.
05. INCLUDE A CLEAR CALL-TO-ACTION
Okay! We’re almost done with our pin image!
How are you feeling so far? It’s not so bad, is it?
Now that we have most of our pin image completed, now it’s time to throw in a call-to-action to entice your Pinterest followers to click even more!
Some examples of call-to-action can be:
- “Freebies Inside!”
- “Learn More”
- “Click Now!
- “Get Yours Today!”
- “Reserve Your Seat!”
- “Sign Up and Get 50% Off Today Only!”
Whatever you choose to include in your pin, make your audience have a sense of “Gosh, I need to click on this pin right now to see what the deal is!”.
My favorite call-to-action to use is the freebie opt-in example. These works so well because it shows my audience there is something for them to benefit from (for FREE) when they click over and read. At the end of the day, they have nothing to lose!
OPTIMIZE YOUR PINS USING SEO
Pinterest is very similar to Google in the sense that it uses keywords and keyword phrases to help this otherwise “social media” platform turn into more of a visual search engine.
This is why Pinterest is so well recommended by just about everybody if you’re trying to gain traffic to your website.
Pinterest users go onto the platform and search for a particular subject and decided whether or not to save or click based off of the design and helpfulness of your pin.
This system is so remarkable and when you learn the code to crack the system, you’re going to see traffic coming in by the thousands.
So how exactly do you using SEO with Pinterest if it’s not exactly the same as Google?
01. DO KEYWORD RESEARCH
When you’re doing keyword research for Pinterest, it’s best to utilize the Pinterest search bar, as it gives you basically all of the information you’ll need.
It helps you to narrow your focus and find more relevant results.
To get started with coming up with the keywords you’re going to use throughout your profile, sit down with a piece of paper and go through this exercise:
- Create a list of the main topic areas you want to target throughout your account. These will be the broad terms that you will begin your research with.
- Go to Pinterest and the search broad terms see what comes up. If pins that show up aren’t your topic area, try another keyword.
- If you get a keyword that offers relevant pins, look at the top of your screen below the search bar. There should be a list of relevant keywords that you can also take advantage of.
- Gather together these keyword ideas from Pinterest.
- Write down each Pinterest board that you have (or are planning to create) and list at least 10-15 keywords that you’ll consistently use throughout that board (board name, board bio, pin SEO).
02. WRITE DESCRIPTIVE PIN CAPTIONS
Even though Pinterest is a relatively visual platform, your text still matters just as much, especially for the Pinterest algorithm.
Don’t be afraid to include in-depth details about your blog post or product. Tell your audience how the product will benefit them, how they can use it, or an interesting fact about the product or blog post.
This will help Pinterest locate and display your pin to relevant searches throughout the platform.
When you’re writing your description, you’ll have up to 500 characters, which can be seen when a user clicks on your pin. Write in complete sentences and provide lots of details!
03. USE HASHTAGS
Similar to other social media platforms, Pinterest has latched onto the popularity of hashtags.
Hashtags help to categorize pins into a particular subject that users can easily discover.
Your hashtags may very well be exactly the same as your keywords, but they also could be different.
Similar to keyword research, I like to search hashtags on Pinterest before I put them in my description to make sure that people are actually searching for them and that multiple pins are showing up for that one hashtag.
04. ALT TEXT/IMAGE DESCRIPTION
When you are uploading your image onto your website, make sure that it as a great “Alt” text and description of your product or post.
This is information that Pinterest will look for when someone pins from your website.
It’s also a good SEO practice to have in general as a blogger.
Start Pinning on Pinterest
Now that you’ve optimized your Pinterest account, decided on which pins you’re going to publish, and designed eye-catching pins with great keywords and hashtags, the only thing left for you to do is utilize strategy to pin on Pinterest.
I’ve personally use and recommend two different type of strategies that can get fast results with minimal effort.
Using Pinterest to promote your Etsy shop is a great way to get extra targeted traffic to your shop in a short period of time!
If you can implement all of the tips and strategies that we discuss in this guide one by one, soon you won’t even have to rely on Etsy SEO anymore – dream come true!
I hope that this Pinterest Guide has been very helpful for you and your Etsy Shop!