The Best Way to Outline Your Next Planner Design
Last week, we talked about the brainstorming and researching process, which is my first step in my design workflow, and there I explained that while there are times where spontaneous design is needed, for the majority of my projects, I always start with a plan. Which in this case, is in the form of wireframes.
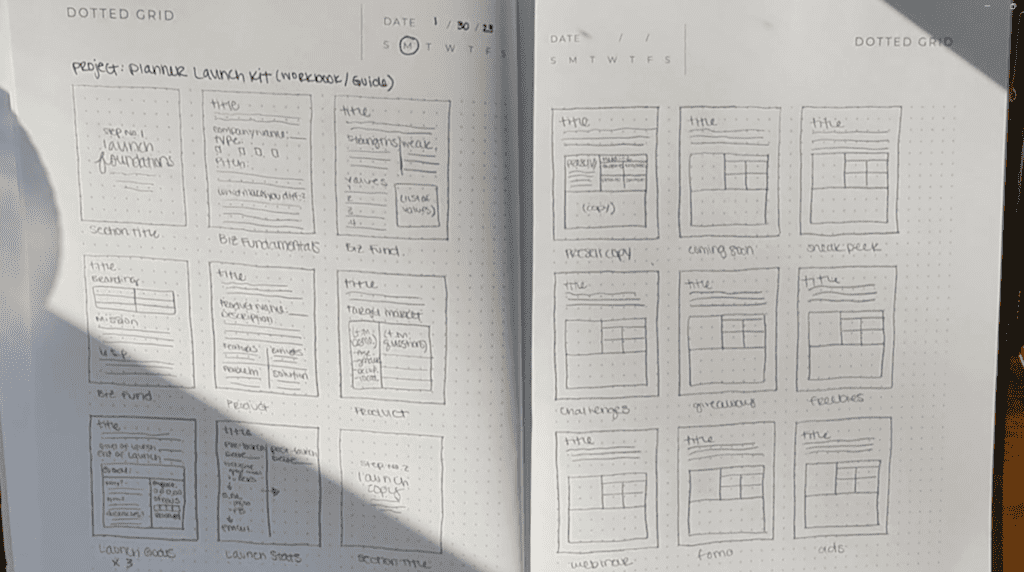
A wireframe is an illustration of a page’s interface, and it mainly focuses on spacing, hierarchy of content, and intended behaviors. I don’t typically include specific details such as styling, color, or graphics because I want my wireframes to mainly focus on the functionality of the planner.
Wireframes are the bare bones sketches of your planner pages to get the main framework down, which makes it incredibly easy when you sit down to actually start designing.
For me, I typically draw my wireframes with pen and paper, which I recommend you do as well, because when you’re sketching your outlines, it feels a lot less final.
If I go straight into designing or try to digitally mock up a wireframe, I tend to design as if I’m designing a final draft rather than a first draft. Meaning, I’m more focused on how it looks rather than how it functions, which in my opinion, is the most important part of a planner.
Okay, so let’s go ahead and get started!
Related Post: 4-Step Process to Designing Planners that Sell
How to Draw a Planner Layout
GRAB YOUR MATERIALS
For my outline, I use a dot grid notebook (here’s the one I use) to sketch my wireframes, which is completely optional.
Before I used dot grids, I would use pretty much anything I had, whether it was lined notebook pages, blank computer paper, or scrap pieces of paper. Whatever you can get your hands on will work for this step!
SET UP YOUR PAGE
For my process, first, I draw the outline of each page. Then, I’ll write the names of the pages based on the list of pages I drafted during the research process underneath so I can know what the main focus is for that page.
SKETCH YOUR PLANNER PAGES
Next, I’ll begin my sketch of the planner pages.
Sometimes I’ll add in written copy for the prompts if I think of something as I’m sketching, but for the most part, as you can see it’s pretty basic. I do just enough to get the idea for the page, but I don’t spend hours thinking about colors, fonts, graphics, and the overall style of the page.
DEVELOP YOUR OWN LANGUAGE
Additionally, the more you outline, the more you’ll start to develop your own language that you understand as you’re turning your outlines into designs.
For me, I know squiggly lines means I want to add written copy as a prompt for the page. Relatively straight lines means I want to add in lines for the user to write. And if I’ve written a “x3” next to a page, it means I want to duplicate that particular page three times.
I also usually leave little notes for myself in parenthesis so I know what my thought process was as I was outlining. So, if you reference the image above under the page titled “Biz Foundations”, I’ve written “list of values” inside of the box, meaning once I begin designing, I know that is what I want included in that section.
These are just little rules I’ve made for myself as I outline but they may look different for you.
I’ll continue to outline each page that I plan to add into my design, and once my sketches are complete, I’ll move on to actually designing them into my design software!
Creating a Planner Wireframe
I hope found some value into this quick peek into the second phase of my design workflow for my planner projects. It’s pretty straightforward, but it’s honestly one of the most impactful steps to keep my process streamlined so I can pump out designs quicker.
So, I highly encourage you to give it a try and outline the pages you listed during your research phase. See if you notice a difference in the quality of your final designs or if you feel like you were able to better capture your visions for your planner in your final designs.
And also, if you’d like to learn more about how to actually sell your planners online, feel free to check out our free ebook – How to Successfully Sell Digital Products Online – where we’ll go over how to take the planners you’ve designed and turn them into passive income.
As always, thanks so much for stopping by.
Until next time!